Solutions are a routine part of lab life. They are used every day in the lab for a variety of applications, from the stock solutions that are used in almost everyone's experiments, to solutions created specifically for your experiments and maintained as a short-term stock, to solutions mixed as part of experiments for one-time use. They can also include master mixes of multiple reagents created to develop more even plating of reagents and control experimental conditions. There are many different ways that these solutions are referred to and for a beginner in the lab, it can be incredibly confusing to hear these terms thrown around. Don't be overwhelmed! The solutions are simple to make and you will quickly learn to make them. However, make sure you understand how to do it because messing up your dilutions is an easy way to waste expensive reagents and interfere with good experimental results. Here, we'll go over the common terminology around dilutions and we'll discuss how to mix standard solutions.
This refers to the dilutions such as 1x, 5x, 10x, 20x, 100x, and so on. You can, of course, use any number but these are the most common. This description is used for stock solutions that are routinely used in the lab and that are required in large quantities. Keeping a small bottle of a 20x or 100x solution allows the lab to easily generate large quantities of 1x solution as needed. You can also do this for yourself if there is a reagent you use routinely. You make a 20x stock and dilute it out whenever you run out of your 1x stock to expedite the process.
This description means that the concentrated stock solution is 5, 10, or 20 times stronger than what you need it to be. You need to dilute these solutions down to 1x which is the concentration that you actually need. Using extremely concentrated solutions can destroy your cells or tissues, so ensure you dilute correctly before using.
To dilute these solutions think about the concentration as parts of a whole. This means if a solution is 5x and you need to get it down to 1x, you need 4 parts water and 1 part of the stock. That way, it will become 5 times weaker and get you down to 1x. If a solution is 10x, use 9 parts water to 1 part stock. Essentially, if you are using a stock, use 1 part of the stock and then add in all the remaining parts as water until you reach the final number for the stock.
For example, let's say we have a 10x PBS stock and we want to make 1000mL of 1x PBS. To do this, we first need to divide 1000 mL into 10 parts, giving us 100 mL per part. Then, we will add 9 parts water and 1 part stock. This means we will add 900 mL water and 100 mL of the 10x stock to make 1x PBS.
Let's do another example. We have a 20x sodium borate stock and we want to make 100 mL of 1x sodium borate. We start by dividing 100 mL into 20 parts, giving us 5 mL per part. Then, we need 19 parts water and 1 part 20x stock. This means we will add 5mL of the 20x sodium borate and 95 mL of water to achieve our desired 1x concentration. You can see how this would be hugely helpful to a lab. Having just 100 mL of sodium borate 20x stock would allow us to generate 2 liters of sodium borate 1x solution as and when we need it.
The ratio is another very common way of expressing necessary dilutions in labs. This takes two forms - one is with x being a small number - say 1:5 or 1:2 - which works similarly to the dilution discussed in the section above. It means that 1 part out of 5 must be the stock, or 1 part out of 2 must be the stock. That means you would add 1 part stock + 4 parts water or 1 part stock + 1 part water respectively. For example, if I have an MTT stock solution and I want to make 10mL of a 1:10 dilution in PBS, I will take 1 part MTT stock + 9 parts PBS. 10 mL divided into 10 parts is 1mL each, so I will add 1mL of my MTT stock + 9mL of PBS to create the final stock.
The other form of the ratio is when x is a very large number. This is typically used to express antibody dilutions, as antibodies are extremely expensive and extremely potent. To use them, you will typically use dilutions ranging anywhere from 1:50 (at the lowest end) to 1:10,000 (at the highest end). Common dilutions include 1:100, 1:1000, and 1:5000. To calculate these, the 1 is essentially negligible so we don't calculate 4999 parts to the 1 part, we just add 1 part into 5000.
Let's go over this more clearly. Let's say that I am using goat anti-rabbit secondary for an experiment and the recommended dilution is 1:5000. I need 10mL of the 1:5000 antibody solution for my experiment to put my cells in overnight because I have 10 wells that need to stain and each one takes 1mL of antibody solution. So, what does 1:5000 mean? It means that for every 5000 microliters (5mL) that I use, I should add 1 microliter of antibody. We are talking about a tiny tiny amount of antibody relative to the total fluid in the container here. If you find yourself adding a lot, think again and double-check your calculations. Based on the above, for 10mL of antibody solution, I should be able to add 10mL of PBS to a tube and then put 2 MICROliters of antibody in it. I stress this because you do not want to waste antibodies. You will hopefully never find yourself in the position of having accidentally added 20 microliters of antibody to a dilution. However, if you do, you may have just used the entire antibody bottle.
This refers to dilutions such as 1%, 5%, etc. When a dilution is described this way, it's almost always meant as a weight-per-volume dilution, i.e. that you put in a certain weight of a reagent and then dissolve it in a certain volume of diluent. The percentage is always based on a 100 mL volume (which makes sense because it's a percent). For example, if I said we need to make 5% milk in PBS for a western blot, that means 5% weight-per-volume, i.e., 5g of dried milk powder in 100mL of diluent (PBS in this case). You can then scale that formula up or down for the total volume you want to make.
For example, if we wanted to prep 100 mL of milk, we would just measure out 5g of milk and then measure out 100mL of PBS and mix it together. If we wanted to make 50mL, it would be 2.5 g with 50mL of PBS. If we wanted to make 1000mL, it would be 50g in 1000mL of PBS.
For practice, let's work through the following examples.
Let's say we want to make 1000 mL of 1x PBS solution (which is the usable PBS concentration) from a 5x stock in the lab. To do this, we first divide 1000 mL by 5, giving us 200 mL. Therefore, we need to add 200 mL of the 5x stock to 800 mL of water (usually distilled purified water) in order to create a 1x solution.
Let's say we want to make a 1:5 dilution of MTT stock solution in PBS, and we want a total of 50mL of volume. This means 1 part out of 5 should be the MTT stock solution and the rest should be PBS. Therefore, we'll divide 50 mL by 5, giving us 10mL. This means we add 10mL of the MTT stock solution to 40mL of PBS, which will give us a 1:5 dilution.
Now let's say we want to make a 1:1000 dilution of rabbit Notch1 in BSA for an experiment. We want to create a total of 2mL of antibody solution for our plates. To do this, we will first measure out 2mL of BSA and place it into a tube. Next, we'll think about how many microliters 2mL is equivalent to, which is 2000 uL. Now, a 1:1000 dilution means 2 uL of antibody in the 2000 uL of BSA. Therefore, we'll add 2uL of antibody into our 2mL tube of BSA, mix well, and then distribute to our plates.
Finally, let's say we want to mix a 1% solution of milk in PBS for a western blot. We want to make a total of 100 mL so we can cover all our blots. For this, we'll measure out 1g of milk and place it into a 100 mL tube of PBS. We'll mix thoroughly and then be ready to use for all the blots!
As you can see above, the math is easy!! The more you do these calculations, the more automatic it will feel in your mind. Eventually, it will just become second nature. Also, labs usually use the same dilutions over and over again so after a while, you'll just memorize the numbers you need for any given dilution.
To help you out as you get started, here are some online calculators that can help you confirm your numbers.
For more help, check out the protocol section! We have many common lab solutions listed with reliable and easy-to-use recipes. Most standard scientific solutions will have recipes available online through a quick google search as well. Pay particular attention to the storage and longevity of solutions. For things you use often that can be stored, it's helpful to make a large stock once rather than making them over and over again.
The MTT (3-(4,5-dimethylthiazol-2-yl)-2,5-diphenyltetrazolium bromide) assay is a widely used colorimetric assay for measuring cell viability and proliferation in vitro. This assay relies on the conversion of MTT into a purple formazan dye by the mitochondrial enzyme, succinate dehydrogenase, in viable cells. The amount of formazan produced is proportional to the number of viable cells, which can be quantified by measuring the absorbance of the dye at a specific wavelength. The MTT assay is a simple, cheap, reliable, and sensitive technique that can be adapted to a wide range of experimental conditions and cell types. It is widely used in drug discovery, toxicology, and basic research to assess the cytotoxicity of compounds, evaluate cell growth and viability, and screen for potential anticancer agents. The MTT assay is also used in combination with other assays and techniques to gain a better understanding of cellular processes and signaling pathways.
Knowing how to perform an MTT assay is a powerful tool. In this tutorial, we will walk you through the theory, practice, and analysis of this assay. In addition, we showcase reagents necessary for the experiment along with downloadable protocols, planning, and analysis templates. Finally, we wrap it up with some real-world examples!
As discussed above, MTT assays are great for looking at cell viability and proliferation. In this brief video, we go over how these assays work and why they work. It's important to understand these things because they directly inform the limitations of this assay. The key takeaway here is that MTT assays are actually measuring metabolism and we estimate viability and proliferation based on that.

Now that we understand the theory, let's talk about how to perform this assay. Below is a list of materials you will need.
Let's go through some worked-out examples of different ways to set up this assay! We'll discuss a basic dose-response assay, and then further show the exact experimental setup, and finally discuss ways the setup can be expanded to accommodate multiple cell lines, drugs, etc.
In today's digital age, the transition from traditional paper-based lab notebooks to electronic lab notebooks (ELNs) has gained momentum. ELNs offer numerous advantages, from improved organization to enhanced collaboration and simplified data management. There are a number of options available on the market currently and it can be challenging to choose the right ELN for your needs. In this tutorial, we will discuss some of the top options available right now.
We have listed a number of tools below. Of note, we have no affiliation with these tools - they are simply things we have used in the past and found helpful. For further details on how to use them, you can refer to the documentation and tutorials on the individual websites.

Price: Freemium model (Free limited version for academics)
Benchling is a popular ELN that offers a comprehensive suite of tools for scientific research. It provides a user-friendly interface and features such as experiment tracking, data visualization, and collaboration capabilities. It has a highly flexible interface with blank notebooks that can be structured for any purpose you like. The company offers a limited free version for academics as well as a feature-rich full version that is paid.

Price: Freemium model
LabArchives is known for its versatility and flexibility, catering to a wide range of scientific disciplines. It offers advanced data management features, electronic signatures, and the ability to create templates for experiments. LabArchives also provides strong security measures to protect sensitive research data.

Price: Paid
Labguru is an ELN with a strong emphasis on project management and collaboration. It offers tools for experiment planning, data organization, and protocol management. Labguru supports seamless collaboration between team members, making it suitable for research groups and academic institutions.

Price: Paid
SciNote is an intuitive and user-friendly ELN designed to enhance collaboration and streamline research processes. It offers features such as task management, team collaboration, and integration with various lab equipment. SciNote also provides integration options with other popular tools, such as MS Office and Google Drive.
Each of these tools is slightly different. We would recommend trying out each one and seeing what works best for your particular lab and your way of thinking. The most popular ones at this time are likely Benchling and LabArchives. However, there are also other new players coming into the market such as Sapio LIMS, Signals ELN, and RSpace. Overall, given that data is now largely digital, it seems appropriate to transition your lab data to also be electronic.
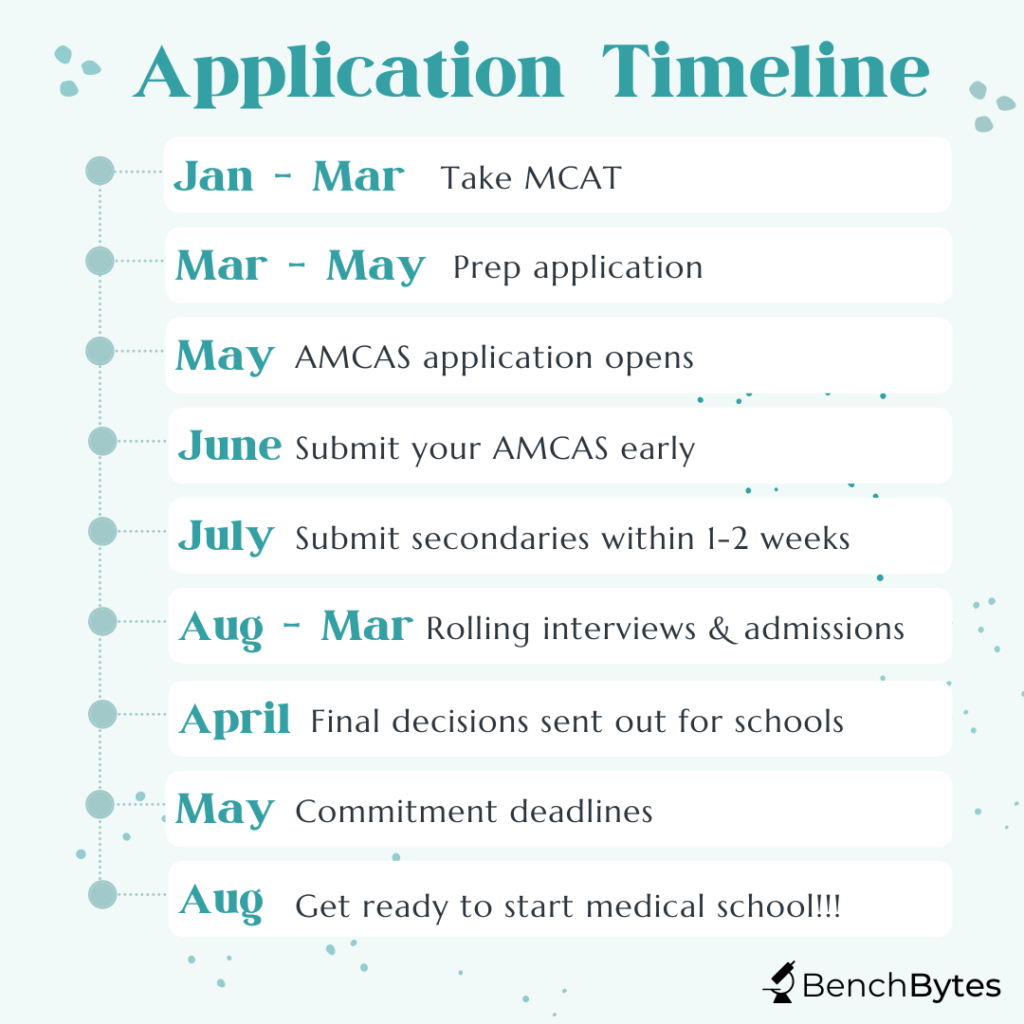
The medical school application process is a long one. It starts the year before you intend to start medical school, i.e., your junior year spring if you are going straight through or senior year spring if you are taking a gap year. That is all to say that the process starts relatively quickly if you are planning on going straight through. It is the first three years of your undergrad that will truly affect your application. In addition, the process is rolling and there is a significant demonstrated advantage to applying as early as possible, once you have your final spring junior year (or senior year) grades and MCAT scores.
We recommend following the timeline below and applying no more than 1-2 weeks after the initial application opens. This means looking at the application in advance and preparing all your answers and essays a few months before to be ready to submit once it opens. Furthermore, although you do have to wait for validation, most schools will send you secondaries immediately upon validation and will expect a turnaround of no more than 1-2 weeks for you to return them. This is difficult to do for multiple schools at once. However, most of the classic secondary questions are available online. We would recommend finding the questions for the schools you applied to and carefully preparing the secondaries during that validation period so that, once again, as soon as you are invited to complete that secondary, you can complete and submit it. This readiness will give you a decided advantage in the process.
Ok, so you know how to time it all. And you know you have to be quick. But now you’re thinking “How do I make it a good application that gets me in?” The simple answer is that there are several checkboxes that get you in the door with the committee. Check off a reasonable number of these boxes and you’ll have a strong application that will get you considered. But it’s a little more complicated than just that so let’s dive into it!
I find the best way to think about your application is to think about it as an optimization problem. You have three to four years and need to maximize the underlying area between all of these checkboxes or points. Remember, NO ONE has a perfect application and no one can maximize all of these things. So don’t be discouraged if you feel one aspect is lacking. Your grades and scores will get you in the door so they are important. You need to not sacrifice that, although again, it’s ok if it’s not perfect. The other thing schools give weight to is that you show you know what it’s like to be in the hospital. This means doing some shadowing and some meaningful involvement with patients (but again, doesn’t need to be perfect). And for everything else, choose what you think you can maximize and focus on maximizing it rather than trying to do everything and doing a poor job.
Let’s look at some examples.


Student A: This student has fantastic grades and MCAT scores. They have done great research and have been involved in clinical and basic science research for a long time, showing commitment and a clear interest. They have publications from their work, including 1-2 first-author publications that they can talk about independently. They have evidence of leadership in research and extracurriculars. However, although they have shadowed a little bit and volunteered some of their time, they don’t have a strong history of being involved in the hospital. This student is still a strong candidate. They should think carefully about hospital-related experiences because they will be asked in interviews. However, even though they didn’t maximize everything, they have shown a strong deep commitment and they will likely see the return on it in the application process.
Student B: This student has good grades and MCAT scores. They are heavily involved in public health outreach and in working with patients. They have worked for a long time at a diabetes clinic and have started their own initiatives there, showing strong leadership and a good understanding of what you can achieve as a physician and how it feels to work with a wide variety of patients. They have been involved peripherally in a few papers on their public health work but have not deeply invested in the research aspect of things. However, again, this is a strong candidate because they have a clear interest and have invested in it, and maximized their curve differently.
Student C: This student has good grades and MCAT scores. They have been involved in some clubs and have some minor leadership roles. They have done a little research but have bounced around a few labs to try different things and have some peripheral publications. They have volunteered at the local hospital but haven’t had a chance to take on a key role given the way volunteers get involved at that hospital. This person, in theory, checks all the boxes but they are mediocre in all of them. They may well still get in the door but they haven’t made as strong a case for themselves as they could have if they had focused their interests a little bit more.
*Emotional intelligence is a key aspect of this grid and is usually assessed in your interviews and essays. Even someone who is perfect on paper may not get in because they are perceived to be not a team player or not likable. Keep that in mind as you go through interviews!
In our experience, pre-meds focus on grades to the exclusion of everything else. This is not necessarily wrong. As we discussed above, it is one of those key checkboxes. However, it’s important to remember that most competitive schools want more than just grades. Decent to good grades will get you in the door. But remember, good grades aren't everything. Many people get into medicine without perfect grades and many people with perfect grades don't make it.
You should show involvement in more than just school, and those activities should show depth and commitment. If it is research, show long involvement in projects over years, with clear impact and publications. If you do bench research, supplement with some faster-moving clinical research to ensure you have publications out before you apply. If you volunteer, choose an experience where you get to truly interact with patients and have a role on their team rather than just shadowing or helping with small tasks. If you are in a club or activity, take on leadership roles and be able to talk about how you contributed.
Aside from grades, this is one of the key components of your application. You are applying to medical school and they want to know that you understand what it means to become a doctor - what the highs and lows are, what the limitations can be of your practice, what it is like to work with patients, and what it is to go through the grueling training. They want to know that you have seen some patients, had some experiences in the hospital, and that you can express how you might deal with challenging situations that we commonly encounter as physicians.
Given all of this, it is incredibly important to not just shadow or just volunteer at a hospital where you have no real interaction with patients. It’s easy to make this mistake and volunteer at the biggest hospital in your area but this often means you are very limited in your role and your interactions with patients. Instead, we would recommend occasional shadowing at that large hospital so that you can understand what doctors do daily and see difficult pathologies and patient situations. (I say occasional because shadowing has limited return beyond a point if you are not able to participate actively). However, we would also recommend that you find a smaller clinic where you can have a more significant role in calling, coordinating, or counseling patients. Examples include performing intake surveys, transporting patients, volunteering as happiness ambassadors, or visiting patients who have no family. Those are roles that will allow you to develop those meaningful interactions. They will allow you to find your reasons to do medicine and describe what drives you.
All of the above is going to get you considered and get you in the door. BUT the secret sauce that makes a great application is building a clear picture of what your passions are and how you’ve fully committed to them. Think of it as an application spike - all of your activities and interests come together naturally to describe your single passion and this passion logically leads to what you want to do in the future. This means doing multiple things that relate to your core interests (which should happen naturally) and then highlighting all those activities, classes, research projects, and experiences on your application as all building towards one clear interest and goal. This makes you unique, memorable, and interesting to schools because you bring a passion that you can then contribute to the class and continue to build on.
For example, if you are very interested in preventative health initiatives, you may have majored in biology and taken classes on public health and cost-effectiveness of preventative healthcare, etc., and then done research that studies the cost-effectiveness of these interventions, volunteered at free clinics that could especially benefit from that approach, and perhaps started some initiative of your own or written something that also contributes to that idea. Putting these activities together in your application with a clear goal of pursuing public health in your future career will make a compelling case to the school that you are passionate about medicine, have truly explored it, and that will bring a unique angle to the class and add diversity. Of course, you may have other meaningful experiences that you should also talk about, but it helps if many of your activities align toward one clear common goal. It creates a memorable and compelling picture of who you are.
We hope this helps! Comment below with any questions or feedback. We are always here to help, and if research is one of your interests, this site will help you build that aspect of your application!
Antibodies are essential tools in biology and biomedical research, with a wide range of applications across different fields. These specialized proteins are produced by the immune system in response to the presence of foreign molecules, such as viruses, bacteria, or cancer cells. Once produced, antibodies can specifically bind to their target molecules, allowing researchers to detect, isolate, or even neutralize them. Antibodies have revolutionized many areas of biology, from basic research to drug discovery and clinical diagnostics.
In this tutorial, we will explore the basics of how antibodies are used and how they work. We will discuss the structure and function of antibodies and how they can be used in different experimental settings. Let's dive in!

Antibodies have numerous applications. The video above describes the general principles of using antibodies for any of the relevant applications. Below are some of the things they can be used for.
In summary, antibodies have become essential tools in biomedical research, with a wide range of applications across different fields. Their specificity, versatility, and ability to bind to specific molecules make them invaluable for studying biological processes, developing new diagnostic and therapeutic approaches, and advancing our understanding of human health and disease.
Understanding the principles described in the video will allow you to easily use antibodies across a range of applications, including western blotting, immunostaining, flow cytometry, live cell imaging, and much more.
Becoming a doctor is a long and challenging journey that requires years of preparation and hard work. For students interested in pursuing a career in medicine, the pre-med timeline can be particularly daunting. From selecting the right courses to preparing for the MCAT and navigating the medical school application process, there are many steps to take and decisions to make along the way.
In this tutorial, we will provide an overview of the pre-med timeline and the steps that aspiring doctors typically take before applying to medical school. We will cover each stage of the process, from the early years of college to medical school graduation and beyond. Whether you are just starting out on your pre-med journey or are already well on your way, this post will provide valuable insights and advice to help you navigate the path ahead.
The overall picture to keep in mind is that you have four years (or perhaps five, with a gap year) to get your application as ready as possible for medical school. The last year is typically not included in the application, since you will submit over a year before your intended start date, so that should be factored into your planning. In the beginning, you should focus on figuring out if a career in medicine is right for you. Use your classes, activities, experiences, mentors, etc to really explore and decide. After that, the next two years should be spent building up the components of your application. Traditionally, these components are thought of as (1) good grades and scores (2) research (3) clinical activities and volunteering to show exposure to and interest in medicine (4) a clear interest in something within or beyond medicine that a number of your activities, classes, and experiences relate to (5) evidence of leadership and commitment throughout the above. The last year will be spent on the application process, which starts in May of your junior year (for people going straight through) or May of your senior year (for people taking one gap year).

Disclaimer: There are, of course, deviations to this timeline and many different paths to medicine. Perhaps you take multiple gap years, or perhaps you decide in your last year of college and do a post-bac. Either way, if you've decided medicine is for you, don't be discouraged. However, this specific tutorial focuses on a traditional timeline.
If you are taking gap years, move all application-related components in the timeline above (AMCAS, essays, recommendations, etc.) the appropriate number of years out. Use your gap years to deepen your application - pursue meaningful research, work in a hospital, gain medical exposure by being an EMT or a scribe, or do a post-bac if you need to complete pre-med requirements. Talk regularly with advisors at your school or mentors you have identified throughout the process to determine when you are ready to apply.

Undergraduate research is often a key component of your medical school application. If you want to go to academic medicine-focused programs, having a strong research background is one of the things that is closely examined in the process. It's useful to spend your first year exploring so you can choose a lab that focuses on something you're excited about. Ideally, you would to stay in this lab for the next four years and develop a strong relationship with the PI and develop a publication record. If you do switch labs, switch early, find a good fit, and then work to develop that longevity. Finally, if you are doing basic science in a lab that doesn't publish as often, it may be good to supplement with additional faster-moving clinical projects to develop relationships with additional mentors and be able to show publications when you apply.
This website is devoted to helping you develop your research skills and walk into the lab prepared so take advantage of all the tutorials out there. We also have additional tutorials on choosing mentors, identifying projects, etc. so keep an eye out for those.
Sources: The Stanford (Unofficial) Pre-Med Handbook, AAMC Guidelines
Tissue culture is a powerful technique used in modern biology to grow cells, tissues, and organoids in a controlled laboratory environment. It is a complex and intricate process that requires precise techniques and attention to detail. If you are new to tissue culture, it can seem daunting and overwhelming at first. However, with the right tools, techniques, and guidance, it is a skill that can be mastered with practice.
In this tutorial, we will provide you with a step-by-step guide on how to perform tissue culture, specifically focusing on the culturing of cells. However, these techniques can be expanded and applied to tissues and organoids as well. We will cover everything from setting up your space, selecting the appropriate materials and equipment, to preparing cells, and maintaining cultures. By the end of this post, you will have a solid understanding of the tissue culture process, and the skills needed to successfully perform tissue culture experiments in your laboratory. So, let's get started!
The first and most important rule of tissue culture is that everything must remain sterile at all times. Make sure you fully understand how to maintain sterility while working. If your lab regularly cultures cells, you should have an appropriate tissue culture hood, and often a separate tissue culture room, that contains hoods and the cell incubators. This is because it is incredibly easy for cells to get contaminated, and once bacteria or other organisms settle into your cells, the culture is lost and you must start over. As you can imagine, if you have special lines or specific cell types that are hard to culture or obtain, this will set you back massively in your work. There are some basic rules to help you maintain sterility throughout each step of your work.
As you start and get your reagents together for TC, remember to always wear clean gloves when you reach into the hood or the incubators. Don't ever touch anything inside the hoods, incubators, or anything that is marked as sterile with your bare hands. Touching or opening things outside will contaminate them and make them unusable. Before putting your gloved hands into the hood or the incubator, make sure that you spray them down with 70% ethanol to ensure sterility and cleanliness.
Anything and everything that goes in the hood must be sterile. That means that any reagents used inside the hood should NEVER be opened outside the hood. They should be purchased sterile (or sterilized in your lab by autoclaving). Before bringing them into the hood, they should be sprayed down with ethanol. Before taking them out of the hood, they should be tightly closed. They should be stored in a defined location where only sterile items are stored and there should be no mixing between sterile and non-sterile items. (Do pay attention to where they should be stored though - different items may need to be at 4 degrees, -20 degrees, or room temperature). The same applies to other items - pipettes, multi-channels, etc. - they should be delineated as sterile for the hood, be autoclaved, and then only opened inside the hood.
When you work in the hood, make sure that all your items remain sterile as you work. Do not ever open cells outside the hood. Cells go straight from the incubator to the hood and are only opened briefly inside the hood as needed to work. For reagents, maintaining sterility means that anything that touches the inside of your cells or reagent bottles must never touch your hands or any other surface in the hood. (For example, if you have a pipette tip that you are working with, make sure it never touches the outside of any bottles, your hands, or anything except the reagent it is meant for and the cells). Close or cap items as soon as you are done with them. In general, if something touches you or if you are unsure, throw it out and use a fresh tip. Use fresh tips for every reagent and every cell type to avoid contaminating your reagents and your cells with other materials.
Once you are done with the hood, make sure to replace all the items, clean it well with 70% ethanol, and then close it and turn on the UV to fully sterilize it for the next person.
Given the discussion above, let's talk about how to recognize if your cells are contaminated. At first, it can be difficult to tell but you should check your cells daily for signs of contamination. Early signs of contamination include small black dots among your cells or low cell growth and increased detachment. As it progresses, the media will often change color and become progressively cloudy and eventually, the cells will detach and die. As you develop experience, you may also notice that your incubator might start to smell a little funny if there is something in it that is contaminated.
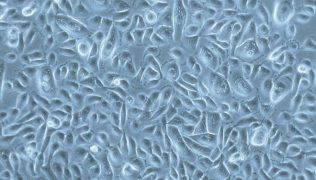
A clean culture should look like this
A contaminated culture may look more like this:

Since the first rule is maintaining sterility and avoiding contamination, the next thing we talk about must be what to do if you do have contamination! The best thing you can do for yourself is to start, if you are new to the process, with a cell line that passages easily, is relatively hardy, and one that your lab has plenty of stock for in case you do have contamination. Examples of these are 293T cells or HeLa cells, which most labs have in abundant quantities. It is also a good practice to separate your media and reagents from your labmates and to keep your cells in a specific part of the incubator so that you can isolate which reagents may be affected if there is contamination.
Once you are comfortable working with those cell lines and are confident that you can work without getting contamination, you can progress to more difficult cell lines. It is still always a good idea to keep your work materials separated from your lab mates, in case there are any issues.
If you get contamination, the best thing to do is start over. The contaminated plates should be soaked in bleach and then dumped. You should obtain fresh reagents you are sure are sterile, clean out your incubator, sterilize it if possible, and then start afresh. If it is not possible to throw away the potentially contaminated reagents (expenses, etc.), another technique is to plate just the media overnight and see if it grows anything. If it does, you know it is the source of contamination, but if not, perhaps you can try again with the same reagents. If you truly are using a very precious cell line or resource, you may try treating it with antibiotics, frequent media changes, and frequent washes to salvage the line. However, this is not a permanent solution if you have significant contamination.
To ensure that you have a fallback, anytime you obtain a cell line or create a line (with a knockout, transformation, or other modification), you should FIRST expand and freeze stock of the line. Freezing protocols are included below. Freezing the lines ensures that you will always have stock that you can start afresh with if you should need it. We would recommend freezing at least 5-10 vials if possible before proceeding with any major experiments.
Now that we've talked about avoiding contamination, let's briefly discuss the broader assessment and maintenance of your cell lines. The goal of tissue culture is to maintain and propagate cells for experiments. If your lab depends heavily on cell models, chances are you will always have an incubator full of cells and at least an hour or two of your day will be spent maintaining those cells.
Part of that time, each day, should be spent looking at the cells and assessing for contamination and confluency, and then maintaining the cells appropriately based on what you find. The important things to do each day are the following
The list above will determine your cell culture maintenance for the day. The contaminated cells should be disposed of to avoid spreading to your other lines. Replate them from frozen if they are required for experiments. The confluent cells should be passaged out to new plates so they are less dense and have room to continue to grow and remain healthy. Cells that haven't had media changes should have fresh media to encourage growth. Finally, cells that are required for experiments should be plated out for those experiments assuming they are healthy and relatively confluent, along with additional maintenance plates so you don't lose the line. If the cells are not ready enough that you could plate your experiment and maintain extra cells, they should be given a few more days to continue growing.
In this last section, I want to briefly discuss how I think about the steps involved in TC. To me, there are four major steps:
We discussed the first step above. This is essential to make sure you have a good stock of cells at all times to be able to produce data.
The second step typically involves washing your cells, removing the media, and then adding in some sort of enzymatic detachment solution (trypsin, EDTA, etc.). This will detach the cells from the plate and allow you to remove them so that they can be transferred to a tube.
The second step, once the cells are detached, is to separate them from the old media. This is usually done with centrifugation in 15mL or 50mL tubes. Since the cells are heavier than the media, they will settle to the bottom when spun. This will allow you to then remove the old media and maintain the cell pellet. It is important here to not lose your pellet when removing the media.
Once the pellet is isolated, you can do anything you want! Step 4 is our decision point. We can either decide to freeze the cells here, using a special freezing media. Or we can plate the cells for an experiment (with additional maintenance plates) which will require counting and then plating cells in appropriate dishes dedicated to our experiment. Or we can simply re-plate the cells into fresh plates at a lower density. When you do this, remember that you do not have to re-plate all the cells - just plate what you think you will need and either freeze or dispose of the rest.
Here are the materials you will need to perform tissue culture.
Tissue culture protocols vary widely based on the type of cell, tissue, or organoid being cultured and the specific media and treatment requirements. However, here is a basic protocol that can be adjusted to your needs.
It is important to follow proper sterile techniques throughout the cell culture process to prevent contamination and maintain healthy cell growth. Additionally, specific cell types may have unique requirements, such as the addition of specific supplements or a different media composition, so it is important to consult the literature or manufacturer's guidelines for the specific cell type being cultured.
Here is a listing of useful resources to assist you:
This is a cell counter sheet that can calculate the total cell number per mL in your sample, and help calculate specific amounts of cells for specific applications.